Android 15 이상 기기에서 SDK 35 이상을 타겟팅하면?
Android 15 이상을 실행하는 기기에서 SDK 35 이상을 타겟팅하면 앱이 더 넓은 화면을 표시하게 됩니다.
시스템 표시줄 뒤에 그려져 디스플레이의 전체 너비와 높이에 걸쳐서 표시되는데 이를 Edge to edge 라고 부릅니다.

이전 Android 버전에서 사용 방안은?
앱이 SDK 35 이상을 타겟팅하는 경우, Android 15 이상 기기에서 더 넓은 화면이 자동으로 사용 설정이 되게 됩니다.
이전 Android 버전에서 사용 설정하는 방안입니다.
dependencies {
    val activity_version = activity_version
    // Java language implementation
    implementation("androidx.activity:activity:$activity_version")
    // Kotlin
    implementation("androidx.activity:activity-ktx:$activity_version")
}
Activity의 onCreate에서 enableEdgeToEdge 확장 함수를 호출하여 수동으로 사용 설정할 수 있습니다.
override fun onCreate(savedInstanceState: Bundle?) {
    enableEdgeToEdge()
    super.onCreate(savedInstanceState)
    ...
}
기본적으로 시스템바를 투명하게 만들지만, 상태바가 반투명 스크림을 얻는 3가지 버튼 탐색 모드에서는 예외입니다.
시스템 아이콘과 스크림 색상은 시스템 밝음 또는 어두움 테마에 따라서 조정되게 됩니다.
Edge to Edge > 시스템 바 인셋 대응 방안은?
시스템 바 인셋은 일반적으로 사용되는 유형의 인셋인데, 앱 위의 Z축에서 시스템 UI가 표시되는 영역을 나타냅니다.
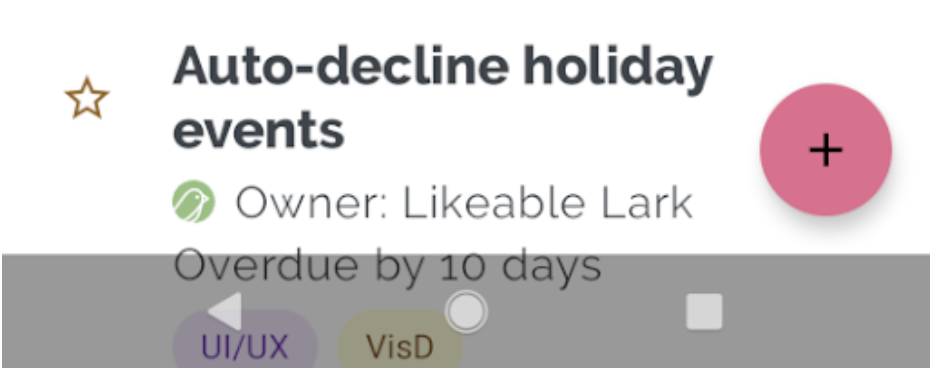
아래와 같이 FAB 플로팅 작업 버튼은 탐색 모음에 의해 부분적으로 가려져 있습니다.

제스처 모드나 버튼 모드에서 시각적 중복을 피하려면 getInsets(int)를 사용하여 뷰의 여백을 늘릴 수 있습니다.
ViewCompat.setOnApplyWindowInsetsListener(fab) { v, windowInsets ->
  val insets = windowInsets.getInsets(WindowInsetsCompat.Type.systemBars())
  // Apply the insets as a margin to the view. This solution sets
  // only the bottom, left, and right dimensions, but you can apply whichever
  // insets are appropriate to your layout. You can also update the view padding
  // if that's more appropriate.
  v.updateLayoutParams<MarginLayoutParams> {
      leftMargin = insets.left
      bottomMargin = insets.bottom
      rightMargin = insets.right
  }

  // Return CONSUMED if you don't want want the window insets to keep passing
  // down to descendant views.
  WindowInsetsCompat.CONSUMED
}
위와 같이 코드를 적용하게 되면, 이처럼 시각적 중복이 발생하지 않습니다.
Edge to Edge > 컷아웃 인셋 대응 방안은?
일부 기기에는 디스플레이 컷 아웃이 있습니다.
화면 상단인 상태 표시줄에 포함되는 편이며, 기기 화면이 가로 모드일때 수직 가장 자리에 있을 수 있습니다.
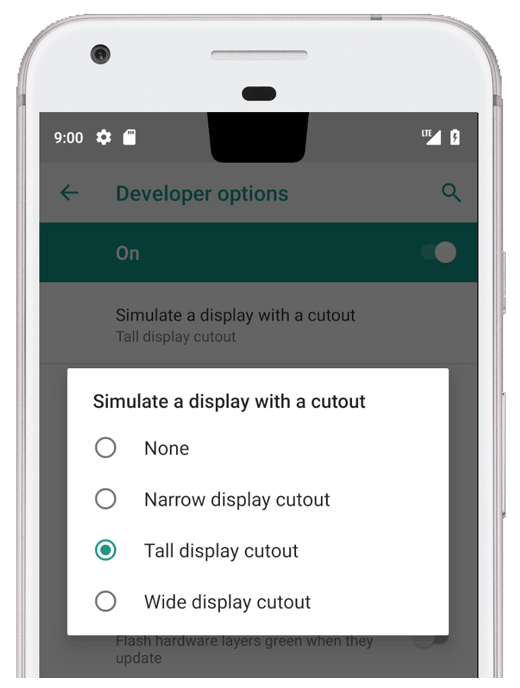
디스플레이 컷아웃이나 시스템 바를 가리지 않도록 코드를 적용해줍니다.
ViewCompat.setOnApplyWindowInsetsListener(binding.recyclerView) { v, insets ->
  val bars = insets.getInsets(
    WindowInsetsCompat.Type.systemBars()
      or WindowInsetsCompat.Type.displayCutout()
  )
  v.updatePadding(
    left = bars.left,
    top = bars.top,
    right = bars.right,
    bottom = bars.bottom,
  )
  WindowInsetsCompat.CONSUMED
}
clipToPadding 패딩이 리스트와 함께 스크롤되도록 설정합니다.
false로 설정하면 부모 뷰의 패딩 공간을 무시하고 자식 뷰가 패딩 영역을 넘어설 수 있습니다.
<androidx.recyclerview.widget.RecyclerView
    android:id="@+id/recycler_view"
    android:layout_width="match_parent"
    android:layout_height="match_parent"
    android:clipToPadding="false"
    app:layoutManager="androidx.recyclerview.widget.LinearLayoutManager" />
Edge to Edge > 시스템 제스처 인셋 대응 방안은?
시스템 제스처 인셋은 시스템 제스처가 앱보다 우선시되는 화면 영역을 나타냅니다.
시스템 바 인셋과 마찬가지로 getInsets(int) 사용하면 제스처 인셋과 겹치는 것을 막을 수 있습니다.
아래의 주황색으로 표시되는 영역을 말합니다.

Android 10 이상에서는 시스템 제스처 인셋에 홈 제스처를 위한 하단 인셋과 뒤로 제스처를 위한 좌우 인셋이 포함됩니다.
아래 코드는 시스템 제스처 인셋을 구현하는 방안입니다.
ViewCompat.setOnApplyWindowInsetsListener(view) { view, windowInsets ->
    val insets = windowInsets.getInsets(WindowInsetsCompat.Type.systemGestures())
    // Apply the insets as padding to the view. Here, set all the dimensions
    // as appropriate to your layout. You can also update the view's margin if
    // more appropriate.
    view.updatePadding(insets.left, insets.top, insets.right, insets.bottom)

    // Return CONSUMED if you don't want the window insets to keep passing down
    // to descendant views.
    WindowInsetsCompat.CONSUMED
}'Android > layout' 카테고리의 다른 글
| [Android] Jetpack Compose 선언형 UI의 모든 것 (0) | 2024.11.29 |
|---|---|
| [Android] 위젯 구성에 대한 사용 설정 (0) | 2024.11.20 |